
As Labor Day comes to a close, we welcome in the fall! With autumn’s arrival, you might want to think about breaking out those fall decorations for your pad. Not only can you purchase fall inspired home decorations at Art on the Wabash this September, but you can make some yourself! Be crafty this fall and make your home gorgeous for the season.
To help you along the way, we went to Pinterest and posted our favorite DIY fall
decoration ideas here. Take a look!
Rope Vases
Create a rope vase for your dinner or coffee table for a simple, rustic feel.

Here’s what you need:
- Recycled receptacles that hold water
- Rope
- Hot Glue
- Paint
1. Wash your receptacle and cut pieces of rope that are a few inches longer than the receptacle.
2. Spread hot glue along one side of the bottom perimeter of the container.
3. Line up the pieces of rope, side by side along the bottom perimeter so that the pieces of rope are glued side by side along the bottom edge.
4. Once all of the pieces are glued to the bottom, line up the rope pieces and glue them to the rest of the container. Trim and wrap rope along the edges (how you do this will vary depending on shape of your container.)
5. Paint over the rope as desired.
Courtesy of Justina Blakeney.
Maple Leaf Mason Jars
This is a fun project to do with the kids! The jars will look great in the window or on a table of your home.

Here’s what you need:
- Maple Leaves (real or fake)
- Mason Jar
- Sponge Brush (optional)
- Mod Podge
- Raffia Ribbon
- Small Miniature Candle
- Dip your brush (or fingers) into the Mod Podge and paint a thin layer on a section of the jar.
- Once layer becomes sticky, place a leaf on the jar.
- Paint more mod podge on top of the leaf in thin layers. Be sure to smooth out the edges. Keep painting until leaf sticks securely to the jar.
- Repeat the process. Fill the jar with as many leaves as you desire.
- Let jar dry for a few hours once you are finished gluing on leaves.
- Once the jar is dry, tie a raffia ribbon around the top of the jar and place a candle inside to complete the look!
Framed Gold Painted Leaves
Add a touch of sophistication to your decor with these framed gold painted leaves.

Here's what you need:
- Leaves
- Gold Acrylic Paint
- Medium Brush
- Photo Frame
Here's what you do:
- Wash your leaves from any dirt and sand and let them dry on a towel for a few minutes. Be gentle with them because they might break and tear.
- Put your leaves in between the book pages and let them sit there for at least 2 days. The pressure from the book will make the leaves flat and dry. (It's good to paint a few leaves to see which one turns out best for the frame).
- After your leaves are nice and dry, paint them with your gold acrylic paint. Put on one layer, let it dry for a few minutes, and then paint another layer to get more intensive color. Don’t forget to paint the stem of the leaf. Allow the leaves to dry for at least 2-3 hours.
- After your leaves are dry, pick one that is the prettiest and place it in the frame. Any color of frame will work!
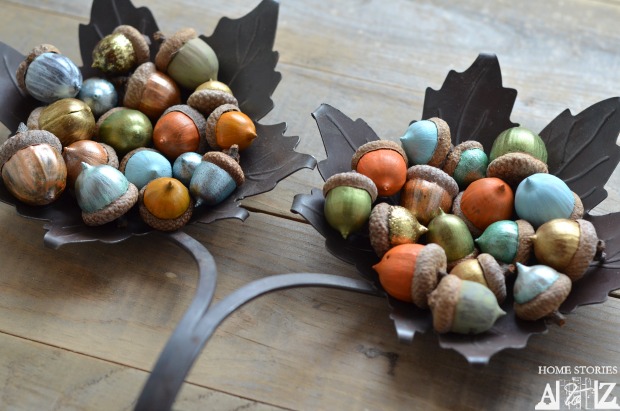
Painted Acorns
This one is a tad more ambitious, since you have to collect the acorns. But, it definitely makes for a unique and colorful fall atmosphere! There are many ways you can use the acorns to decorate your home.
Here's what you need:
- Acorns
- Aluminum Foil
- Cookie Sheet
- Acrylic Craft Paints in a variety of colors
- Medium Brush
Here's what you do:
- Place acorns on foil-lined cookie sheet and bake at 170* for about two hours.
- Use acrylic craft paints and a paint brush to paint your acorns. Brush strokes will make a difference in the acorns’ appearance so brush with the grain of the nut. Acorns are easier to paint with caps intact. If caps have fallen off, they can be re-attached with hot glue. If you want more of an opaque look, add two coats of paint.
- Set acorns aside to dry.
- Once dry, you can place the acorns in a decorative holder or decorate with them whatever way you choose!
Courtesy of Home Stories: A to Z.
Book Page Pumpkin
This is a great idea for a vintage fall look!

Here's what you need:
- Old Paperback Book
- Thick Cardboard
- Scissors
- Ribbon (optional)
- Garden Stick
- Exacto Knife
- Hot Glue Gun
- Tea Bag (optional)
Here's what you do:
- Draw the shape of your pumpkin onto the cardboard and cut it out.
- Remove cover from book.
- Place cardboard over book and cut along with exacto knife. Continue cutting until you reach the end of the book.
- If you so desire, you can stain the pages with some tea from a tea bag.
- Glue a garden stick to the back of your pumpkin book. Glue some pages around the stick.
- Hold pages with a clip while it dries.
- After it is finished drying, you can tie the top of the garden stick with a ribbon!
Courtesy of Craftberry Bush.
Painted Gourds
These shiny gourds are a modern take on a traditional fall decoration.
Painted Gourds
These shiny gourds are a modern take on a traditional fall decoration.

Here's what you need:
- Kraft paper
- Dried Gourds
- Fine sandpaper
- White primer
- Paintbrush
- Glossy spray paint or spray enamel
Here's what you do:
- Cover work surface with paper.
- Clean gourds with a damp cloth and sand off imperfections.
- Paint gourds with white primer. After painting, let them dry overnight.
- After dry, spray sections of gourd with glossy paint or enamel.
- Let dry for 3 hours.
- Turn gourds to spray unpainted areas.
- Let dry overnight and then display them in your house or on your porch the next day!
Courtesy of Martha Stewart.
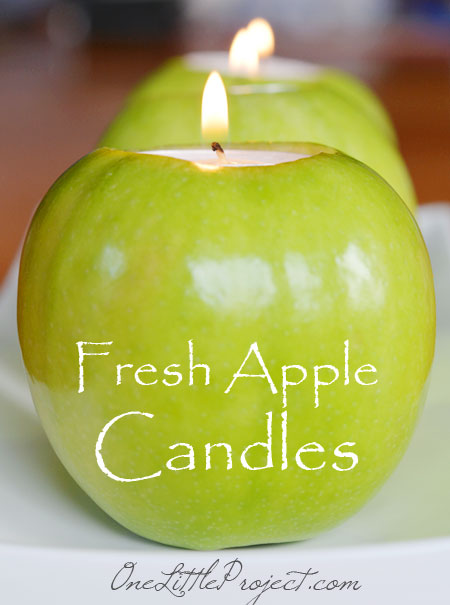
Here's what you need:
- Fresh apples
- A few tea lights
- Knife
- Pen
- Spoon
- Paint Brush
- Lemon Juice
Here's what you do:
- Place the tea light upside down on the top of the apple and trace the circle with a pen.
- Use a sharp knife to cut around the circle. Make a shallow cut first (about 1/4″), and then pry off the top.
- Use a spoon to scrape out the apple.
- Brush some lemon juice on the apple to help prevent it from going brown. Brush over exposed apple flesh.
- Slide in the tea light.
- Light the candle and set it up wherever!
We hope these crafts will add a special autumn flair to your home!
Also, be sure to attend Art on the Wabash on September 21st for more decorations to add to your home decor!

No comments:
Post a Comment